Tuesday, July 25, 2017

#TechTipTuesday - Google Classroom Guardian Summaries

As the new school year approaches it is time to starting thinking about how you will be communicating with your families about what is going on in your learning space, upcoming events, and for some of you sharing homework assignments.

As there are a plethora of tools available for you to do all these things I thought I would highlight a different communication tool each week leading up to school's start to help you explore and think about which method or methods you might employ this school year.

Up this week:

Google Classroom Guardian Summaries.

For those of you who are using or were thinking about using Google Classroom this year with your kids, you are in luck, as Google Classroom has built in a function where you can invite family members to receive emails from classroom regarding assignments and announcements in the class.

To do so, you must start by having kids assigned to your class (you can do this by sharing the code with them or manually adding them to your class).

Once you have kids in your Google Classroom you'll need to activate Guardian summaries
1. Click class
2.Click students
3. Toggle the switch labeled "turn on guardian summaries"
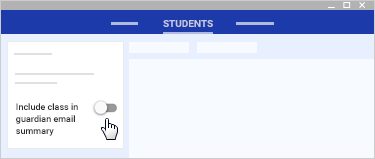
4. Choose the classes you want to have this feature


Now that you have the function turned on it's time to invite families to receive the summary

1. Click the class
2. At the top, click Students.
3. Next to a student's name, click Invite Guardians
4. In the text field, enter a guardians email address.
     (To invite multiple guardians, insert a comma between email address for a single student)
5. Click Invite to send the invitation

Some pros:

1. If you are actively using the assignment feature this is a great way to keep families in the loop about projects and assignments automatically. 
2. You can email all guardians in the class right from Classroom to keep them informed or remind them about upcoming events.
3. It's Google, so you know that they will continue to add new features to help make this tool even better

Some cons:
1. If you do not keep accurate information about assignments in Classroom family members may get summaries of things even though there may not be something that has to be "turned in"
2. The initial setup makes you have to enter in each email address for each kid (though I have been told by some kids that their parents were able to join the classroom themselves, no on has yet showed me how they would've managed this...testing this in the near future)


Over all it is a great function to use for keeping your kids and their families informed about assignments and events taking place with your classroom.

Check it out for yourself by visiting classroom.google.com.

As always,

Stay tuned and stay connected.

Tuesday, July 18, 2017

#TechTipTuesday - Podcasting Made even more easy

 For those of you ever interested in creating your very own Podcast then look no further than Anchor.fm

By using the Anchor app on your phone or tablet, you can now create a podcast on the go with ease. 

Start by grabbing the iOS or Andorid app and setting up your free account. (You can always change the name of your account and profile picture later so do not sweat it)

Once you have your account setup all you need to do is create your first recording. This will then be live on your station for 24 hours after you post it.

If you want to add it as a permanent posting you can do that and then submit your station to become a Podcast to show up in most major Podcasting tools. And the best part, Anchor will do all the heavy lifting for you.

Follow the steps below to setup your first episode to your station and follow through to submit it to major podcasting networks

Step 1: Click on the profile avatar (located on the bottom right of the app) then  click on Epsiode

Step 2: Choose the content you want to be part of your first permanent episode. Start by clicking the +Episode Button and follow the prompts


Choose what you what you want your listeners to hear. Click the play button by each clip to listen to it before you decide to add it to your station

Step 3: After you have your content click the next button (top right) and then Title your Episode 


Clicking next should pop up the option to make your station into a Podcast (able to be found on podcasting networks such as iTunes) If you'd like to do that click "Get Started!"


The App will walk you through the next steps in creating your official podcast, just follow through until you click Finish.

Give your Podcast a name


Add your name or preferred internet handle as the author of the podcast (or perhaps this is a classroom podcast so let the kids choose a handle)


Next choose an image for your podcast (something you might want to have setup and downloaded on your phone  or tablet's camera roll before starting the whole process)


Pick a category for your podcast. What type of Podcast is it? Who is the intended audience? What are you going to be talking about?


Once you have all the above chosen click Finish!


You will now have your first episode setup on your Anchor.fm Station as well as have submitted your first episode for your podcast!


Anchor will keep you informed of the process of your podcast getting picked up by another podcast network (ie when it will show up in iTunes)


Hope today's tip helps you figure out how to use Anchor.fm to create your very own podcast. If you join, be sure to favorite my station anchor.fm/TheTechSpec and others that you enjoy listening to.

Once it is an official podcast be sure to encourage others to subscribe to it

As always,
Stay tuned and stay connected 


Tuesday, July 11, 2017

#TechTipTuesday - The magic of Shift + Z in Google Drive

 If you have not yet used the function Shift + Z while inside Google drive, then I would like to formally introduce you to it.


This key combination will allow you to create a single document (slide show, drawing, spreadsheet, etc) inside multiple folders within Google Drive. This beats the old school method of creating a copy of the same work in multiple folders which you would need to make changes to individually should a change be necessary.

Here's how you go about trying this function out:

Start by loading Google drive, create or locate a file you'd like to show up in multiple folders within Google drive then single click on it, then press the shift key and z key together to get the following menu:


Next click into the folder you would like this document to appear in as well (again this is not a copy of the document it is the same document, if you need to make a change to it you can in either place and the changes will appear ) Then click Add.

The document, slideshow, drawing, spreadsheet, etc will now appear in both places.


Pro tip: If you have multiple documents you want to appear in multiple  locations start by moving them all to a single place then go through the above steps, but use shift click to select all of the documents you want to appear in the other location then press Shift +Z to add them to the new locations.

As Always,
Stay tuned and stay connected