Tuesday, August 27, 2019

#TechTipTuesday - Google Drive Workspaces


It's a brand new year and it is time to clean house a bit and bring back my very favorite writing topic: 
Technology Tips.


My first one of the new school year is about a newish feature to your very own Google Drive called: 


Workspaces

The idea behind workspaces is to create an area inside your drive (much like a folder) where you can quickly access a set of documents, spreadsheets, drawings, etc. Anything you can create under the "create" button can be added to a single workspace and then you can quickly access those files from your main Drive page.

The idea is to help you create a space that let's you "find what you need faster" 
To access this space simply click on the "priority" section under the "new" formerly "create" button

Then click the "create workspace" button, give it a title and begin adding files to the workspace. You can choose up to 25 total files to have in a single workspace and you can add and remove them form the work space at anytime after.

The use cases for this function are entirely dependent on your working style and needs. I find it very useful to have a single work space for a set of files I access on a regular basis but may get lost amongst the "most recent" files floating at the top.

Bitmoji Image


Check it out today in your Google Drive, and send me a tweet letting me know if you'll be using this feature and if so how it helps.


Sunday, March 10, 2019

Sunday Post - Short and Sweet

Thought provoking tweets, the perspective of the state education from a kindergarten teacher and other great articles are only a scroll away. Enjoy listening to Tech on the side - Season 2, ep. 55: Short and sweet while checking out all the great stories, and of course a brand new Under Caffeinated Humor Comic.


March Joke

Sunday, March 3, 2019

SundayPost - Technology Tip Roundup

Listen in on some of my picks for my first ever technology Tip Round Up and scroll through the tips for more information, walk throughs and step by step guides.


Knock Knock Joke

Tuesday, February 19, 2019

#TechTipTuesday - GSuite History Revision Copy

For those of you who have ever collaborated with anyone in a Google Doc, Slide Show, or Spreadsheet then I am certain you know how valuable the revision history function is. 

I have helped many a learner locate a previously edited version of their Google document in order to show what they have done or what another person has done to a document.

Thank's to a quick share from Tony Vincent on Twitter, I am happy to share with you how you can make a copy of document from the revision history.

Tony Vincent on Twitter

⏪ The history of a Google document's revisions can be found in the Version History. It's reassuring to know that you can always retrieve a past version of a document. #GoogleEDU #ClassyGraphics


There are many use cases for this feature, the number one reason I could see making a copy of a past revision is so that you could do a side by side on your screen to either see the major differences between the original edits and the additions or perhaps you are no longer working on the project and want to a take a copy of the work you contributed to before it all gets changed.

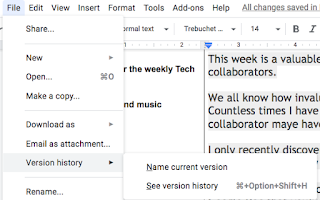
As Tony's post shows to start this process go to the version history page, which you can access by clicking on File> revision History> See version History
OR
Clicking on the "All changes saved in drive" option at the top of your document, spreadsheet, or slide show.


Once you are there you can click on the 3 dots next to the revision and rename it or make a copy of it.


Renaming the version is a great way to document more accurately the changes made or input from others, or to indicate a major change in the direction you were taking the project. 


Once you have clicked on "make a copy" a window will pop up giving you the option to rename the copy you are creating, choosing where you want to save it and the option to share it with the same people who had access to the original document or not.

Special thanks to Tony Vincent who inspired this week's technology tip, be sure to follow him on twitter @TonyVincent for more great tech and learning tips.

Sunday, February 17, 2019

Sunday Post - Boredom, it's actually a good thing.

In this week's Sunday post, you can get caught up on all of the latest updates that come with the most recent iOS update, and why you should update as soon as possible. An amazing article about the importance of boredom, and for the first time ever on my podcast, a guest! And of course what would a Sunday post be without another great Under Caffeinated Humor comic, keep on scrolling, you may discover something new


Bee Joke

Wednesday, February 13, 2019

#TechTipTuesday - Add your Google Drawing directly into your Google Doc

For those of you who subscribe to my podcast, Tech on the Side, you have already heard me rant and rave about how excited I am with the freshly added feature to Google Docs that allows us to insert a Google Drawing right from our Google Drive. So let's dive right into how to use this feature and some screen shots.

It is as simple as going to the Insert Menu

Then choose Drawing...


 If you want to add one you've already created you can choose from Drive and window will appear showing you all of your most recent Google Drawings.

Select the drawing you'd like to add in to your Google Doc, press Select  and then you will be prompted to choose Link to Source or Insert Unlinked.

 If you choose Link to source, the drawing will be linked back to the Google Drawing. 
This means that after you have added the Google Drawing you can edit it and then simply update the drawing on your Google Doc by clicking Update after you have made changes to the drawing.


So you do not have to re upload a new drawing after you have made a change.
The difference between Linked and Unlinked is that Unlinked treats the Google Drawing the same as adding a image. If you make changes to an unlinked inserted Google Drawing you will have to re-upload the new drawing after changes have been made, vs just clicking update.
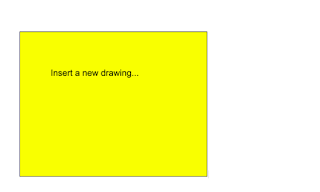
The other option is to add a "new drawing" while inside of Google Docs.
This will allow you to create a new drawing without out having to navigate out of your current Google Doc

With this option, however, you can edit it directly from the Google Doc by selecting it and then choosing "edit"

 Once you make your changes they will appear immediately on your drawing.
Both these options have their benefits and downsides, and I am so excited they have added this both these features as they both have their unique use cases. I look forward to the future where we hopefully get this same function added to Google Slides, Google Sites and other tools inside of G Suites.

Until then, happy (Google) drawing...


Sunday, February 10, 2019

Sunday Post - Now with a brand new segment

Looking back and looking forward at going paperless. Loads of research on how to improve your mood, some changes coming to google, a brand new segment and of course an Under Caffeinated Humor comic.


Moon joke

Sunday, January 27, 2019

Sunday Post - Squad, what's Squad?

Season 2
Episode 49

Alice Keeler on Twitter

My son just taught me a trick. On a #chromebook use 3 fingers left to right on the track pad to change tabs. #googleedu


Snap's New CFO and VP of Investor Relations Both Quit; CFO Clashed With CEO Spiegel

Snap's Chief Financial Officer, Tim Stone, and Vice President of Investor Relations, Kristin Southey, have both left the company after less than a year. Both departures come as the company is still reeling from a disastrous app redesign and is under federal investigation in connection with a class action shareholder lawsuit.

David Joke

Sunday, January 20, 2019

Sunday Post - 2019, here we are.


It's 2019 and the first Sunday post of the new year. For those of you new to the Sunday Post, each Sunday I wrap up all of the articles mentioned in that week's podcast episode into one neat little package I sub the Sunday post. Top the package with the most recent episode of my podcast and you can follow along with the articles and posts I mention while you listen.

Be sure to scroll to the bottom of the post, to catch this week's Under Caffeinated Humor. 
Season 2

ep. 48


Bacon and Eggs Joke

Tuesday, January 15, 2019

#TechTipTuesday - Using Google Maps with Siri

I will be the first to admit it, I do not particularly care for the native iPhone Maps navigation software. I keep waiting for it to get better as they keep promising that it will, but every-time I am in a pinch and ask Siri to get directions to a location I find myself getting stuck in construction, or driving way far out of the way, and even sometimes taking me to a not specific  destination.

I know it will get better with time...but I do not have time to waste on poor directions when there are so many other services that are far more reliable and just seem to get me better.

I prefer to use Google Maps for the most part, occasionally I dabble with Waze, but my go to is Google Maps. It get's me where I want to go, it gives me timely lane navigation and prepares me for what I will need to be doing in a few miles vs suddenly being told....to turn left as I fly past the turn.

So, how can we capitalize on using Siri hands free while getting all the benefits of Google Maps.

To sum it up: Siri Shortcuts!

I found this awesome article giving you the step by step instructions on how to set up the short cut and use it:


I downloaded and setup the Shortcut following the instructions, and aside from the very nature of the shortcuts app being ever so slightly clunky, the shortcut works great.

I say "hey Siri"
wait a second for her to acknowledge me, and then I say to her to "Get Directions" which is the key phrase I used (you can change it to what ever you'd like)

And then she opens up short cuts then opens up voice dictation.

I say a location or place and then Google Maps opens and the step by step directions immediately starts reading them aloud to me. 

Happy navigating.


Tuesday, January 8, 2019

#TechTipTuesday - GBoard Personalized Stickers

Almost 5 years ago I was blogging all about GBoard. A new Keyboard option created by Google for your iPhone.


Fast forward to today and here I am excited to share my latest discovery. Personalized Stickers with GBoard.

While BitMoji holds a special place in my heart...and in my keyboard settings on my phone, I love the option to have more ways to express myself in texts, twitter, etc.

In order to set it up, check out my blog post above if you have never added a second keyboard to your phone, and then follow the steps below to access and create your very own personalized sticker.


Once you have added the keyboard you will need choose emoji option, pictured below:

Then choose the sticker logo


Next up you will want to choose the custom sticker icon, pictured below
 And then the create button, it will ask for access to your camera


 Let is scan your face, and then....

...3 sticker creations of you are made. Each can be customized after they were automatically made so you can change things that you'd like.


Have fun, and please tweet me your new creations @TheTechSpec